Managing subtitles - SubtitleWorkshop tutorial
Hello everyone
I decided to add this very useful tutorial found on one of the sites I am member of. People seem to have many problems with subtitles that they find over the net, that are not always 100 % synchronized and sometimes the subs provided by me are also not 100 % compatible, as I dont have time to check every one line, and my knowledge of languages besides my native and English is rather very poor
This tutorial was originally posted by storno from Retroflix, who granted their permission for this to be posted here
I hope that will clear up things
But for the beginning:
Subtitle sources:
http://www.opensubtitles.org
http://www.allsubs.org
http://www.divxsubtitles.net
http://www.subtitles.images.o2.cz
http://www.podnapisi.net
http://www.subtitleonline.com
And all major subtitle search engines placed on one place:
http://www.subtitleseeker.com
Just put movie name in search box, the site will look for them on all major subtitles sites, after all the results are defined you can use "Update subtitle crawler" button which will update the results with recently added subtitles
And to the point:
SubtitleWorkshop 2.51 can be downloaded for free here:
Download
Introduction:
Subtitle Workshop is the most complete, efficient and convenient freeware subtitle editing tool. It supports all the subtitle formats you may need and has all the features you would want from a subtitle editing program. Subtitle Workshop makes subtitle creating/editing/converting tasks almost a pleasure, the amicable and intuitive interface mixes easy to access menus & must have features with advanced functions and a remarkable speed and stability, drastically reducing subtitle editing time. It includes spell check function and an advanced video preview feature which will ease the task even more. The best choice for the beginner, expert or the fansubber. Beside, you can download Language files and have it in language of your choice.
Dealing with subtitles, we have to establish some facts first ... Subtitles in form of plain text file (softsubs) come in various formats most popular of, are SubRip (*.srt), SubViewer (*.sub) and MicroDVD (*.sub). Other than that, subtitles can be ripped and stored as separate video strips (on a DVD with subtitles, subtitles are stored on DVD as separate video strips, i.e. images). Those are referred as prerendered subs and process of their extraction from a DVD will be subject of some latter tutorial.
As most people in need of subtitle already know, there is a number of specialized sites that offer subtitles in different languages but, since writing of an subtitle is annoying and boring job, and there are so many different rip copy s of same movie out there, you just may not be able to find exactly matching one. Usually some additional info beside title is published such as, fps (frames per second - frame rate of movie), number of CD s (1CD/2CD rip) as well as copy version (usually nick of ripper - eg. aXXo, DiAMOND, etc.). In case you re lucky and all this criteria matches, stop reading here - in all other cases Subtitle Workshop can do the trick and here`s tutorial on how to use it.
Contents:
- Subtitle Workshop main screen
- Adding a delay
- Synchronize subtitles
- Join / Split subtitles
Subtitle Workshop main screen
Before you start, you have to load a subtitle and a movie. Use the menu: File > Load subtitle or just click Ctrl + O. If your movie has the same name as your sub and is in the same directory, you will notice that the movie automatically loads. If not, just use the menu again: Movie > Open or Ctrl + P.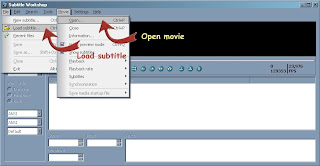
Adding a delay
Case one - all criteria matched but ... when you play movie, subtitle always shows slightly earlier than the line is spoken. When you notice that in the beginning of the movie your sub for instance comes two seconds too early and it still comes two seconds too early at the end of the movie, you need to set a delay. You do this by going to the menu > Edit > Timings > Set delay or just click Ctrl + D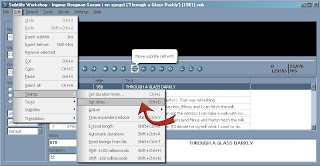
One of following delay dialogs will pop up...
MicroDVD format (*.sub) SubRip format (*.srt)
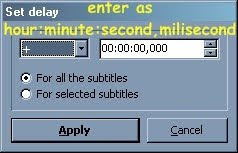
If you are working in the time mode, set a time delay and if you are working in the frames mode, set a frames delay. Subtitle Workshop will automatically detect it (depending on format of subs you loaded). You are able to choose if you want to apply the delay to all the subtitles or just to the selected ones (useful if only part of the subtitles appears earlier/later than it should). So, if the sub comes two seconds too early, use + 00:00:02,000. When your sub comes too late, you just use - instead of +. Alternatively, if you are 100% positive that delay is constant and you reached desired time when sub should appear in player, you can use Move subtitle button (Alt+M shortcut) for faster delay adjustment (first one s start time is equal to the player's time/frame).
Synchronize subtitles
Subtitle Workshop can synchronize subtitles to a video by three methods.
Method 1: Adjusting to synchronized subtitles
This may be the most accurate and easy method, very useful if you have desynchronized subtitles in one language and want to quickly adjust them to an already adjusted subtitle file in another language. This method will work even if both files have a different number of subtitles, the only requirement for proper adjustment is that first and last subtitles in both files correspond - that is, mean the same. This method is extremely easy - you just have to click Edit > Timings > Adjust > Adjust to synchronized subtitles menu (or Shift+Ctrl+B shortcut), and load the synchronized file.
Method 2: Adjusting first and last dialogs
This method offers a lot of accuracy, and is recommended in most cases. After you loaded the subtitle file and video:
* Play the video until the first spoken dialog or the first place that should be subtitled and when you hear/read it, take note of the time (needed later).
* Slide to the near end of the video and when you hear/read the last spoken dialog or the last place that should be subtitled, take note of the time, too.
* You can additionally take this two time values from an external video player instead of using Subtitle Workshop s video preview.
* After you have followed this steps, click the Edit > Timings > Adjust > Adjust subtitles... or the Ctrl+B shortcut. Adjust subtitles dialog appears ... switch to Simple tab.
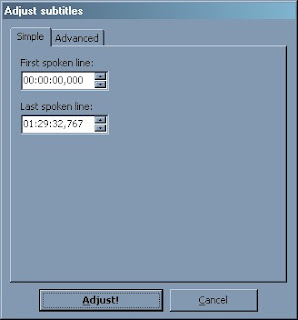
First spoken line box - enter the start time, and in Last spoken line box - write the last time you took. Then press Adjust! button.
Method 3: Synchronizing using two points
This method will work very well in most cases. It works by taking two points of the subtitle file and two points of the video, and calculate the times using a linear algorithm. The first pair of points will be called First sync points and the last pair of points will be called Last sync points. Each pair of points consist in one point in the subtitle and one point in the video, the point in the subtitle has the wrong times and the point of the video has the right times. After selecting the first sync points and last sync points Subtitle Workshop calculates the rest of the times appropriately. The closer first sync points are to the beginning and last sync points are to the end, the most accuracy you get. Note: if the point of the subtitle selected in the first sync points corresponds to the first subtitle, and the point of the subtitle selected in the last sync points corresponds to the last subtitle, then the first formula (first and last dialogs) will be used. Understanding this, you have to:
* First, select the subtitle you want to mark as first point. The first point in the subtitle will always be the selected subtitle s initial time.
* Play the video until you find the right time for that subtitle (first point in the video) and click the Mark as first sync point button (Ctrl+1)
* Now select the subtitle you want to mark as last sync point. The last sync point will be the selected subtitle s initial time.
* Play the video until you find the right time for that subtitle (last point in the video) and click the Mark as last sync point button (Ctrl+2)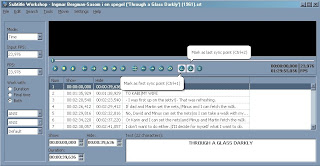
Confirmation message appears, click Yes and the subtitle will be instantly synchronized.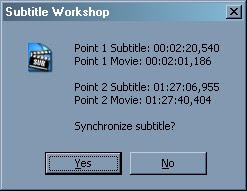
There is even more advanced method - simultaneous adjust of multiple subtitle parts but, since this is to be used in so very few occasions, please consult Subtitle Workshop Help Manual about it.
Join / Split subtitles
Joining subtitles
With Subtitle Workshop you can join more than two subtitles, and those subtitles may be in different formats, time or frame based, and if frame based, they even may have different FPS! Click the Tools > Join subtitles... menu (Ctrl+J).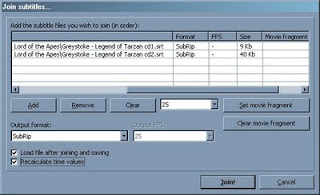
Now press the Add button and add all the files you want, in the correct order. If you made a mistake in the order of one file, you may drag it with the mouse and put it where you want. If the file is a frame based subtitle you may also modify it s FPS selecting it and modifying the value of the combo box that is at the left of the Clear button. After this you need to select the output format. If you want to load the resulting file, check Load file after joining and saving check box. Check Recalculate time values box. Finally, press the Join! button.
Spliting subtitles
In case you found only 1CD copy subtitle and you have 2CD copy movie file, you have to split it and adjust subtitle parts to both movie parts. Here s how to do it ...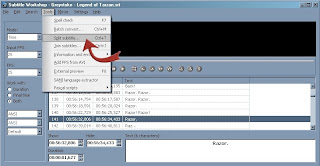
There are two possible splits:
* Simple - splits subtitle file in two parts
* Advanced - splits subtitle file in an indefinite number of parts
Use the one that best fits your needs.
Simple split - You first have to choose where to split the file, depending on subtitle format you have 5 possibilities:
1. Split in selected item - The subtitle file will be split right after the line that is selected in the main window.
2. Split in item number - The subtitle file will be split in the line number you select.
3. Split in given time - The subtitle file will be split in the first subtitle who's initial time is greater than the time you select.
4. Split in given frame - The subtitle file will be split in the first subtitle who's initial frame is greater than the frame you select.
5. Split in end of video - The subtitle file will be split in the first subtitle who's initial time is greater than the time in which a video ends.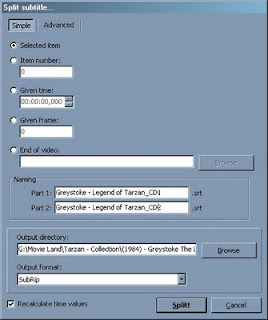
After selecting where to split, enter the ofile names (excluding the extension, it will be added automatically), the output format and press the Split! button. Subtitle Workshop should recalculate times and line numbers in second part, however it is wise to re-check and adjust a bit if needed.
Advanced split - Switch to the Advanced dialogue, and then select the number of parts you want to make.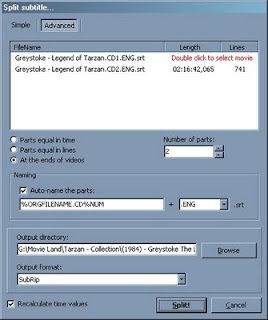
In this case I used the same, 1CD movie copy to demonstrate joining and splitting of a subtitle,
thus Subtitle Workshop points at missing corresponding video part for CD1 subtitle (in red text).
This may too occur in case when one of video parts is (for whatever reason), named differently.
Than you should just double click in red text and point Subtitle Workshop which video file to use.
You have to select if you want to make the parts equal in time (length), in number of lines or if you want to split at the end of multiple videos. If you want to split at the end of multiple videos you need to select a video for each part. You can't select a video for the last part since it will be calculated automatically.
Leave the Auto-name the parts check box checked if you want Subtitle Workshop to set the file names of the parts automatically, if you want to do it manually, un-check the check box, select the desired part & press F2 to type the name.
Check Recalculate time values if you want Subtitle Workshop to automatically set a delay to the second subtitle so you don't have to do it manually after splitting. Finally select the output path, the output format and press the Split! button.
======================================================
Beside all mentioned, Subtitle Workshop can be used for all kind of manual subtitle edition like, subtitle writing, style and color tags edit, errors correcting (search & replace), accepts entire character set of any language and has a number of other options like Command line parameters entering and various OCR Scripts support which all together, makes it the best freeware there is and this tutorial, being basics explained only , deals with maybe 10% of all it can offer. Hope it will clear at least most frequently used options to anyone. Enjoy...

5 comments:
found your post 2 days ago and spent lots of hours in your blog archive ... incredible !!! I feel like I've got an amazing present from santa claus... Thanks for sharing.
But : i want to report two missing links in The Vikings (1958) : cd1 part 3 and cd2 part 8.
Do you have the time ?? Thx anyway
GREAT subtitles instructions; thanks!
For Mac Users if You Download & Install the Perian component for Quicktime open the movie in QuickTime, and if the .srt/.sub file is located in the same folder as the movie, it opens as well. after that, all you need to do is save (via File » Save As), and the subtitle track is merged directly into the movie file.
easy as pie.
& thanks for putting up so many great oldies
Post a Comment